Monday, August 31, 2009

New LO's to Share....

I have been busy this afternoon editing LO's to update my gallery. I guess I need to keep my mind off of my little man's first day of Pre K! Even though it's in the same building and there are a ton of teachers that know exactly what Colin can and cannot have....I still worry that there is a learning curve and tend to carry my phone with me everywhere I go. But considering we got this far into today without any phone calls I'm sure that I had no reason to worry, lol!

I wanted to share this LO that I finished up last night. For some reason I have been stuck lately in the mojo department and I have a feeling it has to do with the lack of edited photos to work with. I am setting a goal to at least edit one or two a day. Honestly I can do a ton more than that but for some reason my brain just sees how many photos that I have to work with and becomes overwhelmed. This is generally followed by mindless internet surfing.

Speaking of mindless internet surfing I finally joined Facebook. I have no idea what I am doing to please request to be my friend and give me some guidance, lol! I have no idea who is talking to who with all of those posts.

Oh right the LO....

Photobucket

This was fun to put together and I only used one sheet of Studio Calico paper and a few scraps to complete it! So not a major dent buster LO but fun nonetheless!

See I used one sheet so I most certainly need to replace it, right?

Saturday, August 29, 2009

How to Take Photos of Scrapbook Layouts...

So before I get started please read this disclaimer. I AM NOT A PHOTOSHOP EXPERT! I, like many of you, searched the internet looking for tips to make my LO's look like the ones I would see in galleries that were so sharp and crisp. I believe in paying it forward and love all of the information that others were willing to share. So it is in that spirit that this post was born :-)

Here are a few links that you may want to check out before getting started. I currently use Photoshop Elements 3.0 and a few actions to do most of my editing. I will be using these actions for this LO but will edit another one without the actions. There are a ton of different ways to get the same result so it is just personal preference.

Mindy's Photoshop Actions
Actions for Elements
Curves Plug In

My current work flow time from start to finish, (this includes taking the photo and uploading it), is about 10 minutes. Honestly it's a lot of work but in the end, it really is the difference between your LO being considered over an equally designed LO with poor presentation.

STEP ONE: So the first thing I do is take 2-3 photos of my LO's in natural light. I generally use my landscape mode on my camera to get everything in focus and turn off my flash.
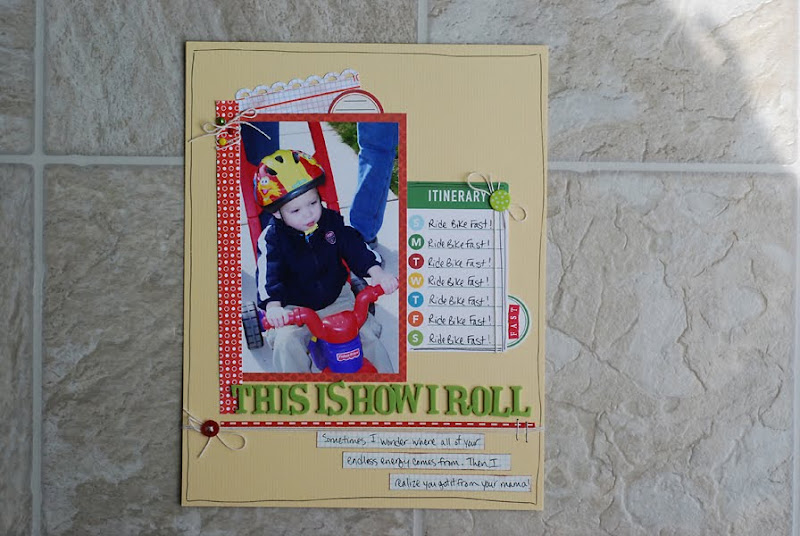

STEP TWO I generally pick the best of the photos to work with. I choose whichever photo is in better focus, and requires the least amount of effort to make it straight.
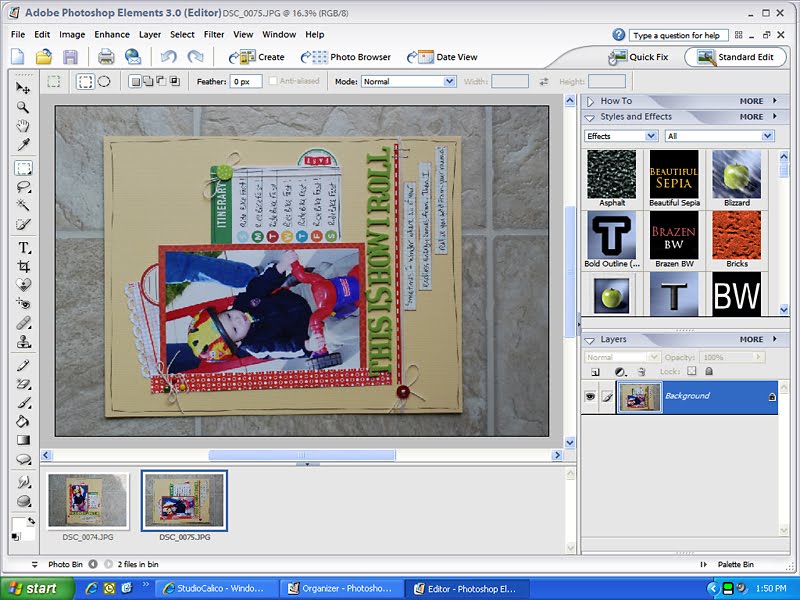

STEP THREE: At this point I check to see if I need to rotate my image at all. I use the rectangular marquee tool to check. I then use Custom settings, located under Image, to rotate the image .1 or .2 if needed. At this point I am not looking for it to be perfect but close enough that when I crop it, I won't loose too much of the LO to make it straight.

STEP FOUR: I use my Curves Plug In to improve the lighting on the LO. I generally run an Auto Layer to improve midtones. Sometimes it helps a little, and sometimes a lot. It depends on how well the lighting for image was in the first place.
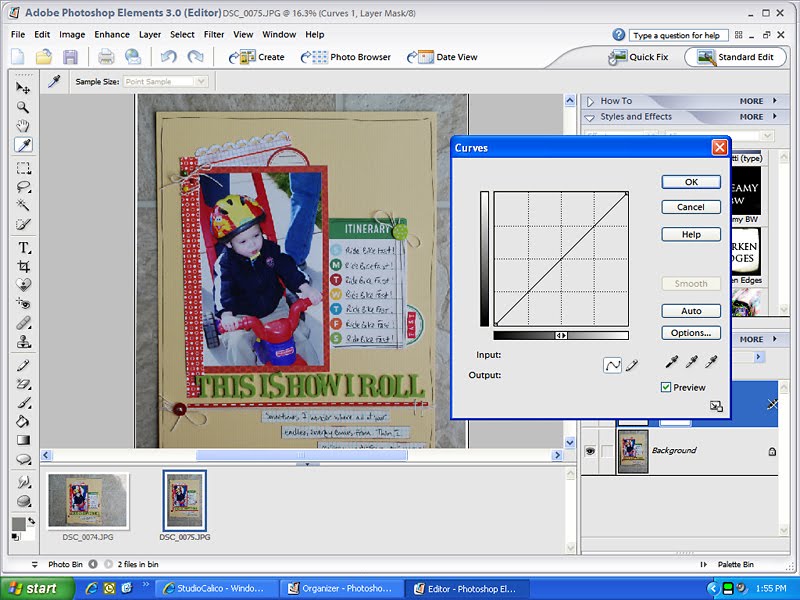

STEP FIVE: A very small difference with this LO.
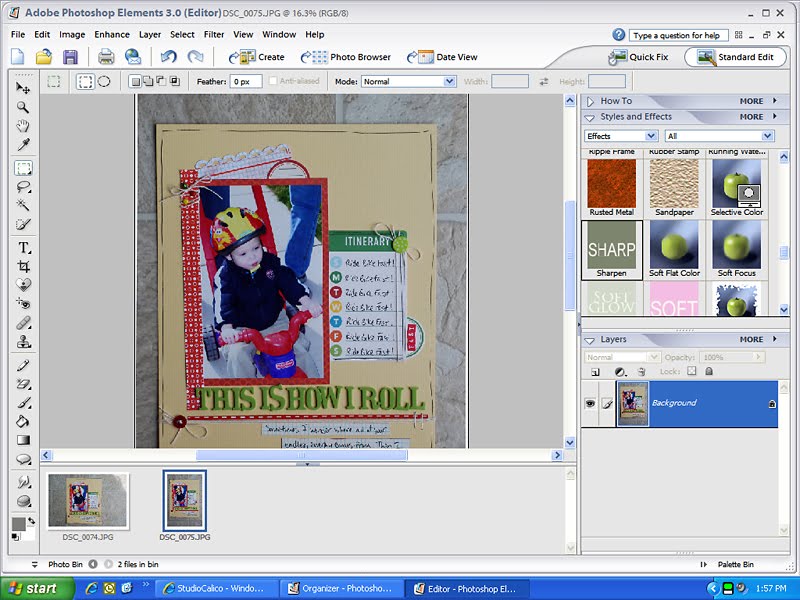

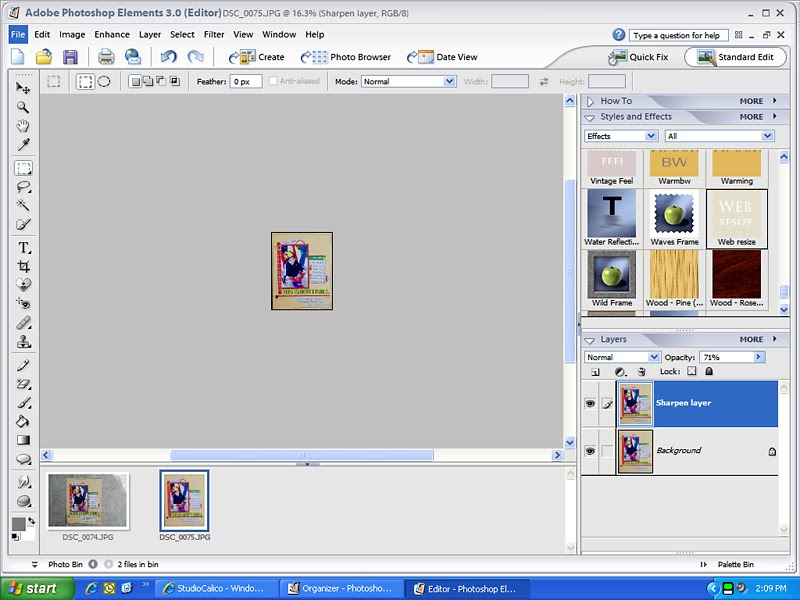
STEP SIX: I then usually use my Sharpen Action here mostly because it flattens the layers for me and it's under my Curves Plug In.


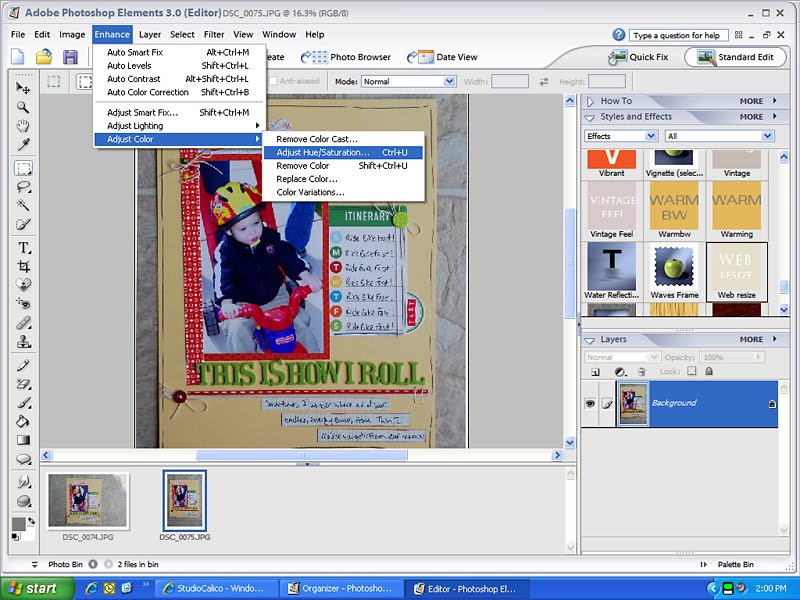
STEP SEVEN: This is the point that I try to adjust the color so that it looks as close to the original LO as possible. One way to do this is to use the Adjust Color then Adjust Hue Saturation Feature. Sometimes I use this and other times I will use my Warming Action. They are essentially the same thing.

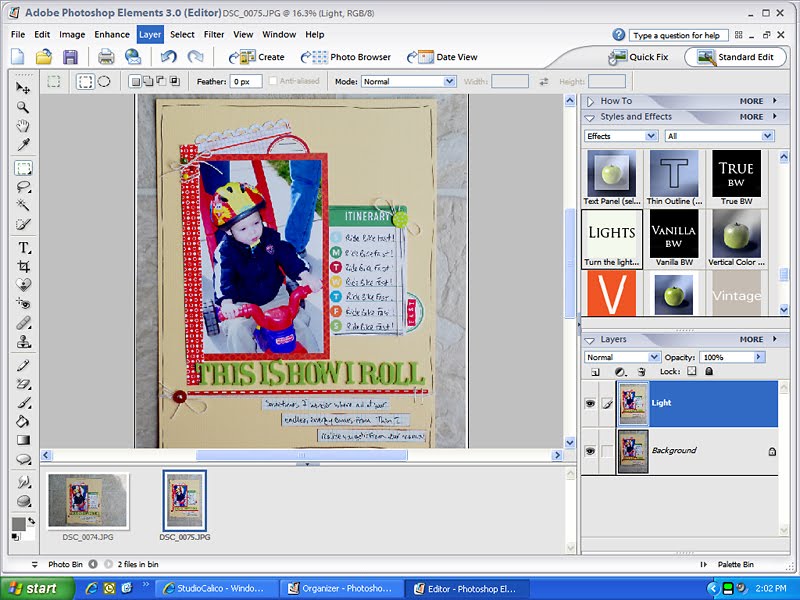
STEP EIGHT: Usually when I adjust my saturation over the entire LO I need to lighten it. Again I use an action for this but the same thing can be accomplished in Levels. This fixed what increasing the saturation did for the reds in my LO and pulled out the skin issues that the Warming Action created. However, overall the image is too light and this is where the "art" of using actions comes in. I changed the opacity on this layer to about 73%. I used the slider to do this until it just "felt right."

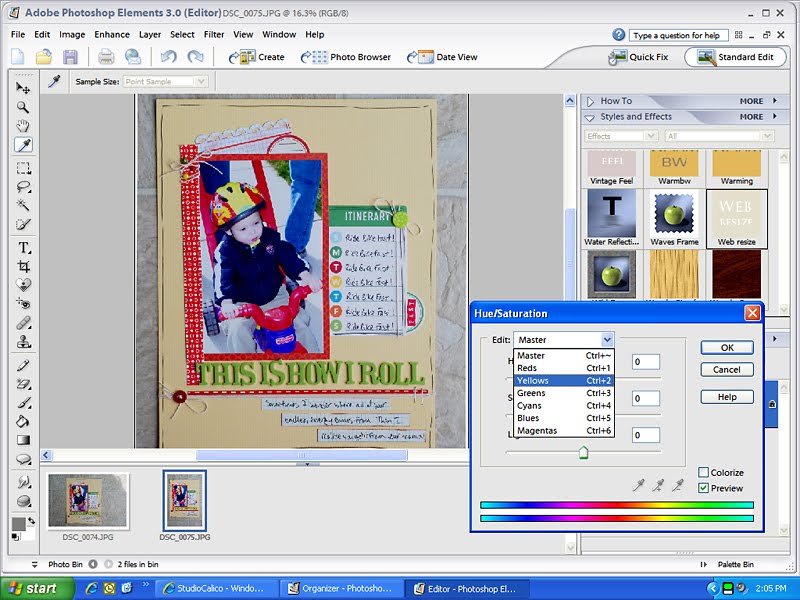
STEP NINE: Again, now I need to "fix" the lightening adjustment a little more by increasing the saturation of my background. I went to Adjust Color, then Adjust Hue Saturation. For this step I only selected Yellows so I could warm up my background.

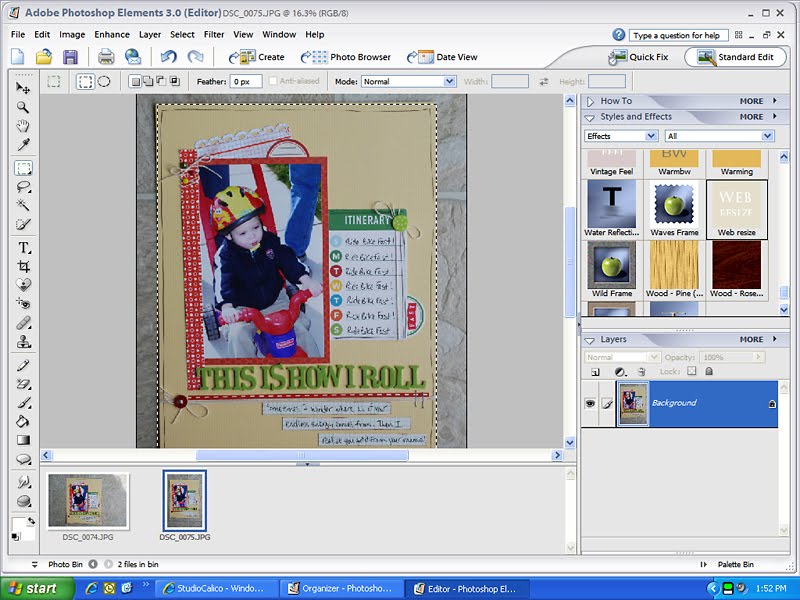
STEP TEN: Now that the LO I took a photo of now looks like the LO that I made, I crop it. I use the Rectangular Marquee tool since it is the most forgiving since I rarely get the LO completely straight. If I am a little off I will try to find part of the LO that I won't miss and just try to make up the difference. I then use a Resize for Web Action. This is important because when you post LO's on the web they loose some detail. Actions that are designed for this purpose include an extra sharpening step.

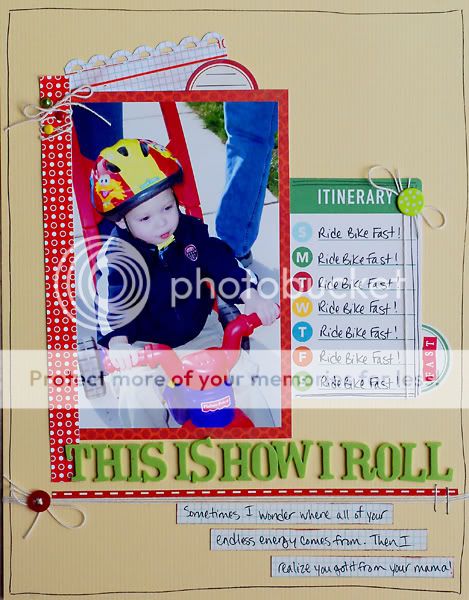
And here's the finished product. I have been using my photobucket account to upload LO's since I enjoy the larger size and then I don't have to deal with image compression issues with blogger.
Photobucket

I hope this post was helpful and if you have any questions, please let me know. I'll do my best to answer them!

Friday, August 28, 2009

Paper Collecting...

I really try to avoid purchasing more pattern paper than I could ever possibly use. I only buy what I love and want to use every single piece of it. However, I'm beginning to become concerned that I couldn't ever use all of the lovely patterns that I have acquired no matter how much I scrapped. Will they be outdated when I get to them or will they be considered an "oldy but goody?"

The forecast is for a rainy weekend so I'm hoping to turn that into a scrap fest that may possibly make a dent in my ever growing stash.

I wonder if there is a midnight crop tomorrow?!

Since no post is really complete without a photo....

Photobucket

So when you need to make some space in your scraproom what do you do?

Do you purge and give to friends or create LO's with as much stuff on them as possible?

Wednesday, August 26, 2009

Joy Ride and A Sneaky Pea....


So first things first. Collage Press is beginning to show their next lines that will begin to ship the end of September. Be sure to head over to the blog to see all of the new products as they are revealed.

Now about that sneaky pea....
I got an email requesting my address for a surprise. I usually don't just hand out my address to just anyone but this girl is pretty cool and honestly...who's going to turn down a surprise?!

So anyway, patience is not one of my strengths and I was worried that the wait and anticipation would be painful.

I had a thought about what it may be but I dared not ask because....could it be true. Could they have really been found?!

Oh yes sirree! My friend Chris answered my SOS from this post.

And let me just tell you...the empty bag looks great in my garbage can :-)

Thanks so much for thinking of me and answering the call!

Tuesday, August 25, 2009

Tuesday Tips....

Photobucket

I planned to blog about all of the funny things that Colin said this weekend but I can't think of a single one right now. Which is a shame because they were pretty funny. I will make a mental note to write them down as soon as he says them.

Some other random tips in no particular order...
1. Store your chip clips on the edges of your wire shelves in your pantry.
2. If you have oily skin and use Bare Minerals Foundation, put the Mineral Veil under and over your foundation.
3. Instead of cutting coupons out that you think you will use, keep them intact and bring scissors to the grocery store. I cut out the ones I know I will use and the ones that I might I just bring with me. It's much easier to keep track of a letter sized piece of paper than an envelope of scraps. I write the date on the front of the coupon insert to match it up with the Money Saving Mom posts.
4. Check out super cute blogs for gift ideas, I am making a cute end of the year thank you for Colin's teachers based on an idea from Bakerella.
5. If you need to get gum or some other sticky substance off of clothing, stick it in the freezer. It's much easier to peel off frozen then in little gooey pieces.
6. Always answer a 407 area code number since it is probably someone from Disney.

Told you they were random.

Saturday, August 22, 2009

5 Product Challenge

I got a pretty cool email from Emily Pitts asking if I would participate in her 5 Product Challenge for the Studio Calico Blog.

Umm hello! Of course I will, Studio Calico is only like my new favorite obsession! I enjoyed this challenge even though it was a little out of my comfort zone and included paint! I was very good though and didn't spill any on my photos.

Be sure to head over to the blog to see a little bit about my process and how I made my little "gift boxes" on the bottom of my LO.

Photobucket

I'm not sure what me and the little man will be doing today. Hubby's at work so Colin and I will have most of the day to ourselves.

I wonder what kind of trouble we can get into before Dad gets home :-)

Take care and has always thanks for stopping by!

Thursday, August 20, 2009

So Why Is It So Hard To Find A Pole Dancing Class?

Especially one that is within 30 mins of here. The best I can do is Townson, MD which is still about an hour. A few girls from work and I thought it would be fun to have some Mommy time while getting in better shape.

I secretly just want to develop enough upper arm strength so I could swing around the pole.

Maybe just once...or twice :-)

If anyone knows of a class in the Central PA area that I am missing, please let me know.

This is almost as important as the licorice .

Although if I find the licorice I will really need the class.